The last moment felicity had rust and old paint!
Please don't come back with holes too much bigger!
Monday, 30 August 2010
The rolling chasis
Attaching the starter motor
Cleaning the steering column
I had left the steering column intact when removing it. It was in good condition with only minor surface rust. The part shown below however, was open to the element and had a lot of surface rust. It was still structurely sound.

As you can see, I had left the screws and fittings attached. Where necessary these where taped in place. If only I had done this more often when taking her apart!


The surface nearst the camera remained pitted where the rust had attacked it. Should there have been some kind of plastic boot covering the holey section? I'm unsure but it would certainlt help to keep away the dirt = wet = rust!


As you can see, I had left the screws and fittings attached. Where necessary these where taped in place. If only I had done this more often when taking her apart!


The surface nearst the camera remained pitted where the rust had attacked it. Should there have been some kind of plastic boot covering the holey section? I'm unsure but it would certainlt help to keep away the dirt = wet = rust!

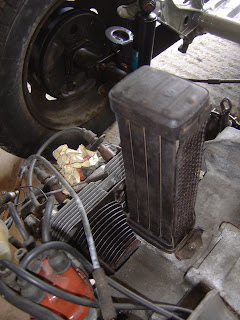
Oil cooler
Got this oil cooler, second hand from ebay. Seems to only have surface rust and at £5 + P&P was a lot cheaper than they sell in the shops!

As you can see in the picture above, I soaked internal chamber in white spirit for a couple of days. Then agitated it and found the left over rubber washer to the right of the holes.

When I took it apart, I placed newspaper in the corresponding holes on the engine block.


As you can see in the picture above, I soaked internal chamber in white spirit for a couple of days. Then agitated it and found the left over rubber washer to the right of the holes.

When I took it apart, I placed newspaper in the corresponding holes on the engine block.

Cleaning up the clutch
The gear box ready for the engine.

The exterior of the clutch plate is in need of a de-rusting.

The fly wheel locking tool.


Can't find any pics of it finished but I can say that I removed the fly wheel and had a bit of a puzzle to work out how it went back.

I have a flywheel locking tool that allowed the 6 bolts to be removed. There is a clutch/ friction plate behind this that is held in place by friction.
When I replaced it all and tried to fit the engine to the gearbox, I found the friction plate had to be centered exactly in order that the engine fits easily. In the bug me video they recommend getting either a tool or the center piece from the gearbox (see top picture). I found it worked just as well to lightly tighten the bolts. Fit the engine, thus centering the friction plate. Remove the engine and then tighten the bolts.

The exterior of the clutch plate is in need of a de-rusting.

The fly wheel locking tool.


Can't find any pics of it finished but I can say that I removed the fly wheel and had a bit of a puzzle to work out how it went back.

I have a flywheel locking tool that allowed the 6 bolts to be removed. There is a clutch/ friction plate behind this that is held in place by friction.
When I replaced it all and tried to fit the engine to the gearbox, I found the friction plate had to be centered exactly in order that the engine fits easily. In the bug me video they recommend getting either a tool or the center piece from the gearbox (see top picture). I found it worked just as well to lightly tighten the bolts. Fit the engine, thus centering the friction plate. Remove the engine and then tighten the bolts.
Sunday, 29 August 2010
Saturday, 28 August 2010
New shock absorbers front and back
Friday, 27 August 2010
Sunday, 22 August 2010
Removing the bonnect catch
Removing the stickers
Sunday, 15 August 2010
Front brakes cleaning
Time to take the front brakes apart.

Fortunately the brake cylinders on the front where in good condition and could be used again. I removed them for cleaning.

Once I'd given everything a quick clean, ensured the adjusters where working and the brake pads had reasonable life in them, I put them back together.

The brake drum was kurusted and will be painted later. You can just see the outer bearing above being pushed into place. The inner bearing remained on the drum.

The outer bearing retaining washer pushed in keeping itself in the locating chanel that can just be seen above.

Finally the cover which has a hole in it for the speedo cable.

Fortunately the brake cylinders on the front where in good condition and could be used again. I removed them for cleaning.

Once I'd given everything a quick clean, ensured the adjusters where working and the brake pads had reasonable life in them, I put them back together.

The brake drum was kurusted and will be painted later. You can just see the outer bearing above being pushed into place. The inner bearing remained on the drum.

The outer bearing retaining washer pushed in keeping itself in the locating chanel that can just be seen above.

Finally the cover which has a hole in it for the speedo cable.
The first shots of the body on the floor
The squirrels no longer have a home
Subscribe to:
Comments (Atom)


